Soft colour works best when it has something simple beside it: plain timber, a quiet wall or bedding with room to breathe. Choose one playful feature, then let storage and the room layout do the practical work.
The example in this guide uses mint, dusty coral and lilac with exposed timber. It is an original design exercise, not a photographed client room. Adapt the colours, furniture and layout to the room you already have.
Looking for Asher's Room?
The former Petite Vintage Interiors article described Belinda's pastel room design for Asher, including a geometric IKEA RAST dresser and a collaboration on drawer decals. That original project, its photography and the Gelato Geo kit are not Simply Maid work or products. The original gallery is not reproduced here.
This new guide covers the design and DIY questions behind many links to that article: planning geometric drawer fronts, making room for toys, arranging a reading corner and spacing wall decals. It does not sell the former kit or promise an exact recreation of its pattern.
Plan the room around its everyday furniture
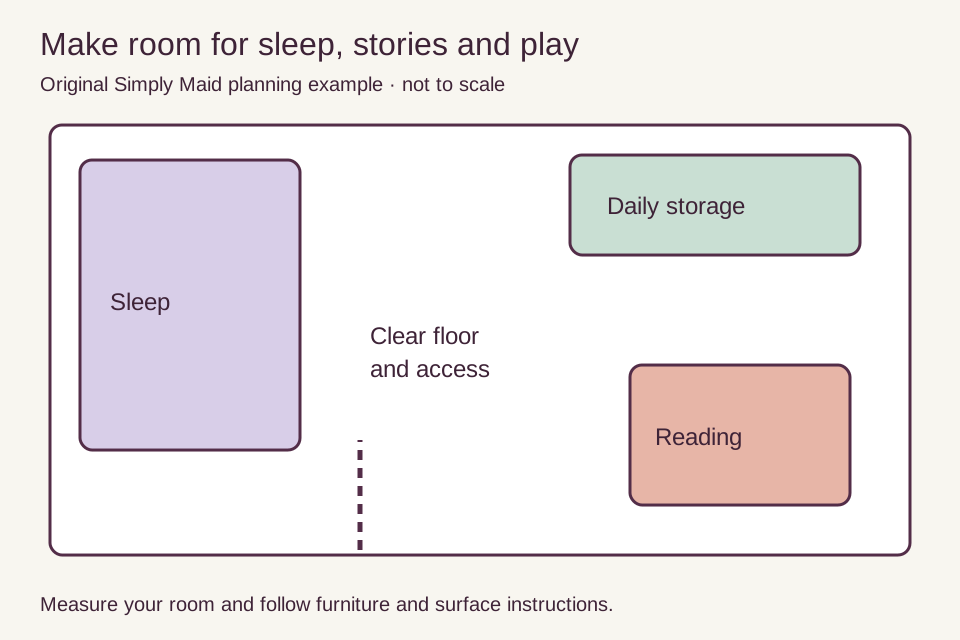
Start with the bed and storage that must stay. Place the bed where it suits the room's access, away from blind cords and other hazards; don't let a decorative wall dictate an impractical position. Mark wardrobe and drawer openings on a measured sketch.
Keep the dresser close to where clothes are used and leave enough space to open it comfortably. Set a reading corner beside a book basket, using a chair or seat designed for its intended user. Let the middle of the floor remain available for play instead of placing a small decorative table in every gap.
Our diagram is a planning example, not a scale plan or a minimum-clearance specification. Measure your own furniture and check manufacturer's spacing and anchoring instructions before placing it.
Choose a palette before buying supplies
Use one main pastel on a substantial element, such as a drawer front or bedding. Repeat it once in a smaller item. Add a second pastel in a limited area, then leave some plain timber or neutral space so that the room doesn't depend on every item matching.
Try the palette with paper swatches beside the existing floor and curtains. View it in daylight and with the room light on. A colour that feels gentle on a tiny sample may feel stronger across a whole piece of furniture.
Make a geometric dresser
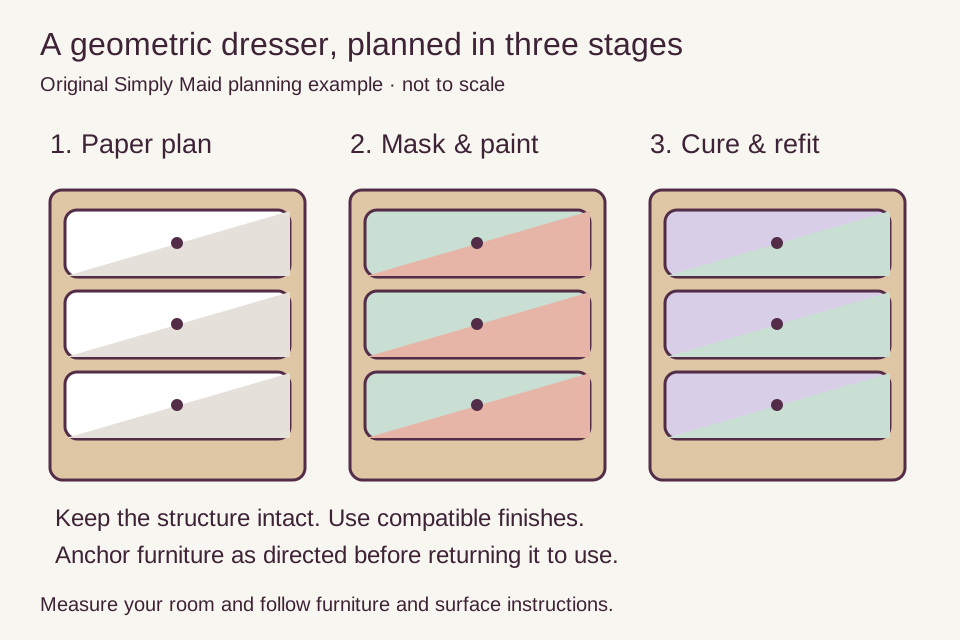
This is a surface-decoration project for a sound, correctly assembled chest. It is not a structural furniture conversion. IKEA RAST is a familiar historical example; measure your actual unit and check its construction rather than using another model's drawer measurements.
- Inspect the chest. Check the frame, drawer runners, handles and anchoring provisions. Repair faults using the manufacturer's guidance before decorating. Don't cut structural parts, change the feet or remove safety fittings for this project.
- Measure each drawer face. Draw it at full size on paper and mark handles, edges and any part covered by the frame. Keep the decoration on the front face, clear of moving surfaces. Decide whether the shapes should line up across all drawers or vary slightly on each one.
- Make paper shapes first. Cut triangles or rectangles and position them on the paper drawer outlines. Leave some areas uncoloured. Photograph or sketch the arrangement so you can reproduce it without guessing halfway through.
- Choose one compatible method. For paint, ask the paint supplier for preparation, primer and topcoat instructions for your exact surface. For adhesive decoration, choose material rated for furniture and test it on a discreet area. Wall decals are not automatically suitable for a drawer finish.
- Prepare away from children. Remove drawers and handles only as permitted by the instructions. Clean and dry the surface with a method compatible with its existing finish. Do not sand unidentified old coatings; get appropriate advice first. Follow the product label for ventilation and protective equipment.
- Transfer the pattern. For paint, use surface-appropriate masking tape and press the edges down carefully. Apply thin coats as the product directs and remove tape at the recommended stage. For adhesive, align a small edge first and smooth gradually according to its instructions. Test on a spare sample before working on a visible face.
- Allow the finish to cure. Dry to the touch is not necessarily ready for handling, cleaning or use. Follow the stated cure time, then refit drawers and handles. Confirm that drawers move freely and no decoration catches the frame.
- Secure and check. Anchor the chest using its specified hardware and wall-appropriate fixings. Check the finished piece before returning it to the room, including loose adhesive edges and any small components that could come free.
The ACCC furniture-safety guide explains why a stable-looking chest still needs suitable anchoring. Put heavy belongings low down and avoid placing attractive toys on top where they may encourage climbing.
Use the dresser as storage, not a display shelf
Give each drawer a clear purpose: everyday tops, bottoms or spare bedding, for example. Dividers can help, but leave enough room that a drawer closes without compressing its contents. A child should be able to return something without rebuilding a complicated arrangement.
Keep the top simple. If a collection needs many small, fragile pieces to look finished, it may be better displayed elsewhere. Avoid putting heavy frames, lamps or tempting toys on an accessible chest merely to match an inspiration photograph.
Make a reading corner and a place for soft toys
A comfortable seat, a small selection of books and good existing room lighting can make a reading corner. Choose a chair or bench intended for seating and follow its weight and age guidance. Don't turn a storage cabinet into a bench by adding a cushion unless the manufacturer supports that use.
Place a basket for a manageable selection of soft toys beside the reading area. Keep the remainder in suitable storage and rotate them if that helps. Leave access to the basket clear; storage behind another piece of furniture is unlikely to be used often.
For face-out books, consider a purpose-made book ledge or floor-standing bookcase secured as instructed. The room design and storage guide discusses the familiar spice-rack idea and its limitations.
Keep the wall treatment simple
A regular pattern of dots or clouds can supply interest without adding furniture. First check whether the wall finish and any fresh paint suit the decal manufacturer's requirements. Use paper placeholders to test the pattern's scale and margins before committing.
Choose a quiet area of wall and keep the pattern clear of fittings. For a measured grid and reusable template, follow our wall-decal layout guide. If the room is shared, our shared-bedroom ideas explain how separate colour accents can sit together.
Look after the finished room
Remove dust with a soft cloth suitable for the finish. Follow the paint or adhesive manufacturer's cleaning instructions; do not assume a new surface tolerates solvents, abrasives or repeated wet wiping. Blot spills promptly without soaking drawer edges. Check decoration for lifting or damage and remove or repair loose pieces before they become a problem.
Keep the design practical with a clear floor route and a short room reset. Clean soft toys and other items according to their labels; our toy-cleaning guide helps you choose a starting method.
About this guide
Original Simply Maid guidance prepared with AI assistance. Published 15 October 2026; linked supplier and service information checked on that date. No independent practitioner review or hands-on product testing is claimed.
Change log
Who wrote and edited this article, when its sources were checked, and what changed.
Current version
- Published by
- Simply Maid