
A repeat of dots, clouds or simple shapes can give a plain wall some interest. Planning the centres before you peel the backing makes the pattern easier to adjust and helps avoid an awkward narrow gap at one edge.
Start with the instructions for your actual decals and wall finish. This guide explains a layout method; it does not make every adhesive suitable for every paint, wallpaper or textured surface.
Check the wall before planning the pattern
Confirm that the decal material is suitable for the surface, including its texture and paint type. Apply a sample in a discreet place and follow the supplier's testing instructions. Don't place decals over damaged, flaking, damp or dirty surfaces.
Fresh paint needs to cure, not merely feel dry. Urbanwalls' preparation guidance recommends waiting about 30 days for its products on freshly painted walls. Your paint and decal manufacturers may specify different conditions, so follow the requirements for both. A longer cure period does not fix an incompatible finish.
Clean only as the surface and decal suppliers recommend, then let the wall dry fully. Avoid leaving a film of cleaner or polish. If you rent, check the property's conditions before applying adhesive decoration; the word removable is not a guarantee against paint damage.
Measure the area you want to decorate
Choose the actual pattern area rather than assuming it must cover the entire wall. Mark windows, switches and other fittings on a sketch. Decide whether the pattern should centre on the wall, a furniture arrangement or a clearly defined panel.
Measure the width and height of that area. Choose the margins from the first and last decal centres to the edges. A centre margin must also leave room for half the decal's width or height; otherwise part of the shape may run past the boundary.
Use a pencil lightly only if marks can be removed safely from your finish. Paper placeholders or a suitable low-tack marking method can help you judge the pattern first. Test any tape before using it on the wall.
Work out an evenly spaced row
For a fixed number of decals, calculate the centre-to-centre gap as follows: usable width between the first and last centres, divided by the number of gaps. There is one fewer gap than there are decals.
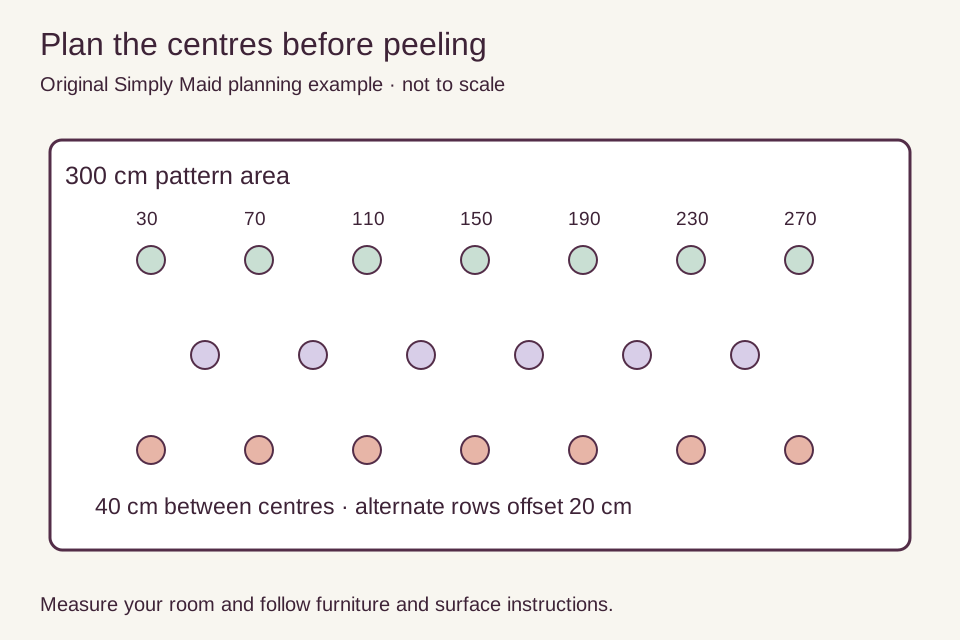
For example, a 300 cm-wide pattern area with the first and last centres 30 cm from its edges leaves 240 cm between those centres. Seven decals create six gaps, so the spacing is 240 ÷ 6 = 40 cm. The centres are 30, 70, 110, 150, 190, 230 and 270 cm from the left edge.
This is a planning example, not a requirement for every room. Check the decal dimensions against the 30 cm centre margin and the 40 cm gaps. If a shape is too large or the result feels crowded, change the number of decals or the margins.
For the vertical rows, use the same approach with the pattern area's height. Count the rows and shapes on your paper sketch before ordering; don't estimate from the wall's square metres unless the supplier specifically provides that method.
Use a reusable template
Cut a square or rectangular template from clean card using the measured interval you have chosen. Mark its centre and the points that represent neighbouring decal centres. A template helps repeat a distance; it does not replace checking the first row and column with a level and tape measure.
For a simple aligned grid, keep the same horizontal centres on each row. For a staggered pattern, offset every second row by half the horizontal gap. In the example above, that offset is 20 cm. A staggered row may contain fewer decals to preserve the margins, so count each row separately.
Stand back after positioning paper placeholders for two rows. Check the relationship to windows and furniture and whether the pattern still looks balanced from the doorway. Adjust the plan now rather than repeatedly lifting the final adhesive pieces.
Apply in a controlled sequence
- Read the product instructions from start to finish, including transfer-film directions where supplied. Lay the pieces out in the planned order and check that the wall is ready.
- Start with one small piece or the supplier's recommended starting point. Align its centre to your mark without covering the reference before you have checked the position.
- Peel and smooth gradually as instructed. Use only the recommended tool and pressure; stretching a decal while applying it can distort the shape or make its edges lift.
- Check each completed row against the next before continuing. Keep a count so you don't discover a missing piece at the far edge.
- Remove transfer film, backing and temporary marks as directed. Keep loose backing, small pieces and tools away from children. Use a stable suitable platform for high areas; don't stand on a child's chair or storage unit.
If a decal lifts, stop and check the surface, cure time and application method with the supplier. Adding stronger glue can damage the finish and change how the product removes. Don't keep reapplying a piece if its instructions limit repositioning.
Care for decals without lifting their edges
Use the manufacturer's cleaning method. Begin gently and test where recommended. Don't scrub across an edge, saturate the wall or assume steam, solvents and abrasive cleaners are suitable. Painted walls and the adhesive decoration may have different limits.
Check periodically for loose edges or small pieces that could detach, especially in a child's room. Remove or repair damaged decoration using supplier guidance rather than leaving loose pieces accessible. Put the focus on a simple, intact pattern instead of trying to preserve every damaged decal.
Remove carefully and plan for touch-ups
Follow the removal instructions for the exact product. Support the paint surface and work slowly at the recommended angle. If the supplier permits gentle warmth, use it only within their directions and keep electrical equipment away from water. Stop if the paint begins to lift and seek product-specific advice.
Test before treating any residue. Avoid sharp scraping tools or an untested solvent on a painted wall. Keep a record of the wall's paint colour and finish, but remember that a new patch can look different from aged paint. Budget for possible touch-ups even when the decal is sold as removable.
About the former Petite Vintage tutorial
Petite Vintage Interiors previously published a decal feature-wall tutorial associated with Belinda's room designs. This is new Simply Maid guidance with an original worked example and diagram. It is not a republication of the former photographs or a claim that Simply Maid created those rooms.
For a broader room plan, visit kids' room design and storage. For furniture and colour ideas, see the pastel-bedroom guide.
About this guide
Original Simply Maid guidance prepared with AI assistance. Published 15 October 2026; linked supplier and service information checked on that date. No independent practitioner review or hands-on product testing is claimed.
Change log
Who wrote and edited this article, when its sources were checked, and what changed.
Current version
- Published by
- Simply Maid
